Pages

Showing posts with label tutorial. Show all posts

Saturday, June 22, 2013

A Boat for our Beverages!


Oklahoma summers became FAR more bearable two years ago when our friends gave us their big, blue, inflatable ring pool.  We were skeptical that its less-than-four-foot depth and 16-foot diameter would A.) be large enough for adult fun and B.) stay cool enough to be refreshing.  We could not have been more wrong!  We LOVE getting in our pool, climbing up on our spring floats, and relaxing.  We've even learned how to read books and magazines while floating. (Carefully!  No library books!  Buy books at garage sales for the pool!)

Last summer, I paid 50 cents for an old Styrofoam cooler with a lid, designed to hold six cans (another garage sale find).  I assume it was designed for boating or fishing.  We used it as our Beer Boat by tying a string and clothespin to it. It floated along with us, safely holding our beverages most of the time.  Unfortunately, it sometimes became unbalanced.  "Beer overboard!"  is not what you want to hear in your pool!
Our original Beer Boat

This year, we have a new pool and summer is becoming crazy hot.  Fed up with the U.S.S. Tippy, I decided to innovate.  I had seen this floating cooler, but I don't need a whole cooler!  (How cool is it, though?!  I will definitely be keeping this one in mind if I have a party!)  Looking instead for individual floating cup holders,  I found this instructable and its related comments.  One prototype later, and here's my take on the beverage barge.

Materials

pool noodle
plastic cup big enough to hold your beverage of choice, in its container, comfortably
small rope (about 3 1/2 feet)
medium-sized zip ties (3)
palm-sized rock or handful of smaller rocks
sturdy mesh fabric  - maybe an onion or orange bag?

Step One - Cutting


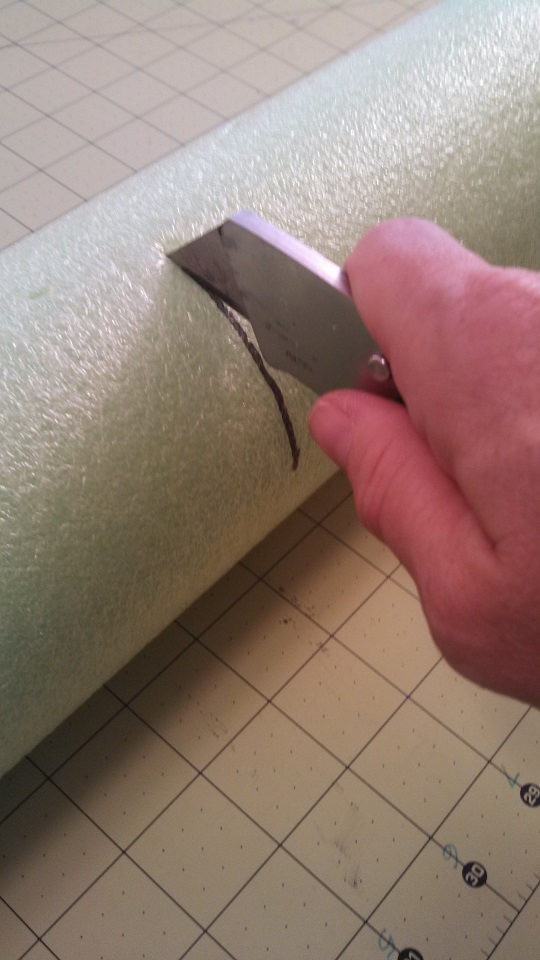
Cut two 7" long pieces of the noodle.


Cut a hole for your cup holder.

My cup holder is an Eskimo Joe's cup.  If you live in Stillwater, you have a cupboard or drawer full of these.  They hold 22 ounces, but they are shorter and squatter than regular plastic cups.  (I can relate to being shorter and squatter, darnit.)  You may have seen the Eskimo Joe's logo on t-shirts around the world.  It's famous.


The bottom of my cup had a diameter of three inches, so I marked three inches in the center of each noodle piece, then drew half a circle to cut.


Step Two - Connecting


Feed a 20" piece of rope through your noodle, from the end to the center cut-out, across to the other noodle's center, and out through the end of noodle number 2.  (Well.  That is probably one of the oddest sentences I've ever written. Probably a picture is a better idea.)


Do the same thing on the other side.  Tighten each side so the cup is held snugly between the two noodles.  Now, normally, this is where I would break out my hot glue gun, however, I'm skeptical that hot glue will hold up on plastic and foam, in the Oklahoma heat and sun, in water, so I was looking for a different way to keep the boat together.  Perhaps a nice squirt of silicone caulking might be an effective way to accomplish this.  I will let you know if I try it.  Today, I simply tied each piece into a snug square knot.  (Remember this from Girl Scouts?  "Right over left, and left over right, makes a knot neat, and tidy, and tight.")

Next, you need to add some ballast to keep the boat from tipping. Innovate!  Consider all the ways you can think of to add ballast to your boat.  One person recommended washers and steel ball bearings, but have you priced washers lately?  Plus, metal in the pool?  My idea was to make a little parcel full of rocks to hang under the boat.  I found a nice rock in my gardening supplies (unfortunately, we don't have a lot of rocks around here that would be suitable, so I used one that had been purchased for use in a flower vase.  Tip:  don't use sandstone!  It'll erode and give your pool a nice sandy bottom.)


Here I'm using a piece of old trampoline netting that was in our trash can this week.  You could try a plastic mesh bag from your onions or oranges, too.  Weave one of the zip-ties through around the top edge, then cinch it tight.

A little package of rocks.

Trim off the excess fabric at the top.  (Really, who's going to know if you do or don't?  I just like things to be tidy.)  Turn your boat over and put the rock parcel on the bottom of the cup.  Wind it through the rope, through the mesh, and zip it closed.  Do this on both sides.  It'll help hold your cup in place, too.  Warning:  don't pull the ties TOO tight, or you'll pop your cup right out of the noodles!  Whoops!


Step Three - Test and Enjoy!


Check it out!  I can put a 32-ounce drink cup (Sonic, anyone?) into my floating cup holder.


Here it is holding my more typical beverage of choice.  Note that my beer is wearing its shirt - this cup holder is even big enough for coozies.  (I am not a huge Spartan fan, by the way.  I just wanted a souvenir from our trip to Michigan State last month for Odyssey of the Mind, and a coozie fit the bill.  It makes me smile when I see my beer wearing a Sparty shirt.  Our other beer shirts are all from Oklahoma State; GO POKES!)

You can also see the prototype beer boat that I made yesterday, with its clothespin waiting to be clipped to a float.  The prototype used a styrofoam coozie that came with the six-pack cooler.  It works, but your beer can't be wearing a shirt and still fit in the boat, so I knew I needed a different option.

This weekend, I will give my floating cup holder a real test.  If modifications need to be made, I will report back promptly.  In the meantime, cheers! 


Thursday, September 6, 2012

Google Reader: My favorite way to follow the blogs I love (continued from yesterday)

Yesterday we talked about two ways you can follow blogs (so that you can tell if there is new content that's been published.)  I use blogs professionally and personally and have learned SO MUCH from bloggers.  When I first started following a few blogs, I used both email updates and RSS feeds in my browser, as well as just bookmarking in the traditional way, but I quickly found drawbacks with all of those.  Today, let's talk  about my favorite way to stay current with blogland.

Better Way #3:  RSS feed to your Reader

I use Google Reader and LOVE it.  I started using it last spring when my college undergrad students were required to follow some education blogs and websites as a part of building a Professional Learning Network (see, it's not just about home improvement and travel!)  I kept seeing articles about using a Reader and thought I'd give it a try.  I tried subscribing to some of my blogs on my Yahoo home page and just wasn't happy with the results.  (This is due partly to the fact that I can access my Yahoo email accounts through several different sites - like "My Yahoo" and "My AT&T," for instance, and each of them has a different interface.  It's so frustrating when you expect one look to pop up and something completely different shows up.)

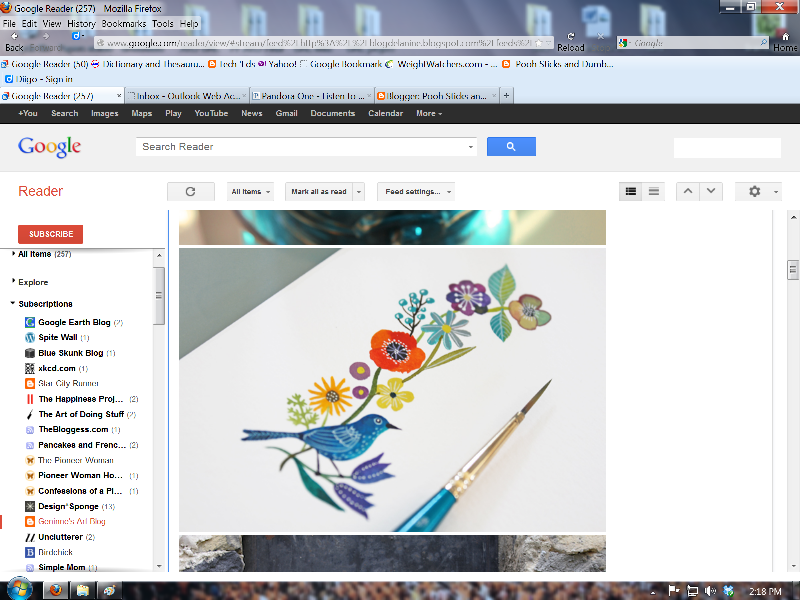
Here's a screen shot of my Google Reader.  You can see that I subscribe to many blogs (the titles are on the left.)  The blog in red is the one whose content is currently showing on the right (Geninne's Art Blog, love her artwork!) The titles in bold are those with NEW CONTENT - time for me to go read a little!  You can also see that I've bookmarked my reader on this computer so I can get to it easily - it's the first bookmark on the left under the "back" button - and, wow, the day I bookmarked my reader, I only had 50 unread posts (it's a little hard to see; my apologies.  I'm a beginning blogger, remember?  It'll get better, I promise.)  You can see at the very top of the screen that today my reader has 257 unread posts.  At first, these unread posts made me crazy.  I really wanted a small number up there.  I've since realized that it's just like the pile of books next to my bed and the pile of magazines next to my chair - it doesn't matter how many there are, they'll get read eventually!


Of course, just like on your desk, you can choose to PILE or you can choose to FILE.  I'm mostly a filer.  In this next shot, you can see 6 of my files - collapsed so that the many blog titles inside don't show right now.  To open them, I just click the little triangle.


To get Google Reader you'll need to set up a Google account. (If you have gmail or Google+ you are already there).  Note:  you do not have to have a gmail account to set up a Google Reader; you just need a Google ID.  Accounts are free, but you do need to be able to read the "Captcha" code to prove you're human.  (EDIT:  Go to Google.com/reader.  If you are not signed in on an account, the page below should show up.)

You can add blogs to your reader in two ways.  You can link from the blog (click the blog's RSS button, just like we did yesterday, but choose Google instead of Atom, and then click Add to Reader when then next page comes up) or you can click the red Subscribe button on Google Reader and paste the URL of the blog in the box.


Click the Google button
Click "Add to Google Reader"


So, add your blogs and watch your list of unread posts grow!  Don't let it make you cranky; you can scan through them quickly or even (gasp) mark them as unread using the button at the top of the page.

 Each blog title has a triangle that will pull up this menu (below), which enables you to create new folders, sort posts, etc.  You can see the titles of my folders and that this one (the red one, remember?) is in my DIY and home improvement folder.  (The photo of the cat and dog is the post currently appearing on Posie Gets Cozy; absolutely gorgeous photos.)  In the reader, you see the posts but not the layout of the actual blog. You can always "click through" to the blog itself by clicking the blog's name at the top of the reader (currently hidden by the pop-up menu.)  (Diane at In My Own Style explains how to install and use Google's "Next" button in this post, which moves you from blog to blog while preserving the view of the blog itself.  After reading her post, I tried the Next button, but personally, I prefer using my reader and choosing what comes up next.  I'm not great with surprises.)


You can also grab a blog's name and drag it to a different spot on your reader's bar or into a different folder.  You can move your folders around.  You don't have to alphabetize; that's just my thing (and they are sometimes alphabetized and sometimes listed in their order of importance to me, so if you see a title "out of order" know that there is likely a reason for it...) I'm sure there are many other cool things to do, I just get so busy reading my blogs that I don't spend time playing with the applications of Google Reader.  If you find one, do leave a comment and let us know!

Wednesday, September 5, 2012

How to Follow a Blog - It's Really Simple! Part 1 of 2

You may be an avid blog reader, or you may just be starting to notice the wonders of Blogland (my guess would be you're noticing blogs because of Pinterest).  Either way, you'll eventually find that there are some blogs you really like, and maybe you haven't figured out a way to easily check each of them to see if they have new content.

The first thing most of us try is simply bookmarking each site.  Then, you sit down with your computer, open each bookmark separately, wait for the site to come up, and look to see if a new post has been published.  This works, except when you are on a different computer, or you can't remember if you've read the post or not.  (And if you're not at your own computer, it can be maddening to try to remember your favorites, and to find them in the vast world of the internets if you don't know the exact URL of the blog.  Also some URLs are hard to type; my blog is a perfect example!)

There exists, my friends, a better way.  Several better ways, in fact, depending on the blog's options.


Better Way #1:  Get an email when new content is published 
On many blogs (including this one, hint, hint!) you can also choose to subscribe using your email.  Notice the boxes on the right - there's one which allows you to insert your email address to subscribe.  Each time a new post is published, you'll get an email!   

Better Way #2:  RSS feed to your Browser
The (usually) orange button you'll find on most blogs is a link to an RSS feed.  This stands for Really Simple Syndication (which you don't really need to know.)  RSS sends a feed directly to your browser.  It's similar to a bookmark, but better!  Just look!  Here's a sample screen shot.  You can see that this person (who must be smart, because she is reading my daughter's StarCityRunner blog; Hi, Tory!)  has subscribed to several blogs (they look like bookmarks until you get a bunch of them, and then they show up as a pull-down list).  When you click on one the drop-down menu shows you which posts you've already read and which are new content (in this case, PancakesandFrenchFries; Hi, Jules! This is definitely the browser of a smart reader.)   This person has 7 unread posts by Jules waiting (what a treat!), the newest at the top.  The three with the ampersand logo have already been read.


To create your own browser feed, you simply click the "Subscribe to Posts" button (or comments, if you'd like to be notified when people comment on the blog).  New windows will come up with more clicking:

On this one, click Atom to add to your browser
On this one, click on View Feed XML to add to your browser.

You'll then click "Subscribe Now" and maybe once more, and you'll see the "bookmark" show up on your browser.
Unfortunately this doesn't solve the problem of making your blog list transportable - it still exists on just the one computer.  To make your list accessible wherever you go, you'll want to create a Reader.  You'll love it!

Tomorrow, I'll show you how to create and use Google Reader to follow your favorite blogs.  In the meantime, if you want more information, I've shared these posts with my college students to help them understand how to follow blogs (we were building our Professional Learning Networks).  You might find them interesting. 
http://simplemom.net/rss-explained/
http://inmyownstyle.com/2012/02/the-best-way-to-read-a-blog.html

Questions?  Something I could have explained better?  Leave a comment!


Tuesday, August 28, 2012

Reviving Outdoor Furniture

I've held onto a few pieces of decent-quality white plastic patio furniture for years, because it felt wasteful to chuck them when they were still perfectly serviceable.  Every year, I'd notice that they looked dingier and more disgusting, and every year I'd say, "This year I'll replace those pieces."  I'm so glad I didn't!  They look brand new now!  Here's how.

Scrubbed, but never PRETTY.
Earlier this summer, I was amazed by a blog post at one of my favorite blogs (In My Own Style) about cleaning outdoor furniture (http://inmyownstyle.com/2012/05/cleaning-outdoor-decks-and-patios-in-style.html).  Diane showed how using Tilex or Clorox outdoor cleaning products took those white plastic chairs from gray to grand (alliteration!)  I have scrubbed outdoor furniture with all manner of products and was never satisfied with the gray left behind.  After reading Diane's post, I gave it a try (and as you can read in her comments section, I found a shortcut.)

Friday, I did it again, with equally successful results.  Now, please don't judge.  I was not intending to do a blog post about scrubbing this chair, but halfway through, I was so excited by the results that I couldn't bear NOT to share it with you, so I dropped everything, ran inside, grabbed the camera, and took a few shots, including my first ever video (which I intended to do without audio, then ever-so-tentatively, decided to say a few words, and now I wish I could do it again, so please bear with me and be kind.)  (I don't normally write in sentence fragments, nor do I normally write run-ons.  Sorry.)

Here's the trick:  Steel wool and bleach water.  The gray wipes right off.

Scrubbing...actually, it's more like wiping.  Not a lot of effort involved.
 Here's the video; it's short, I promise:

And here's an "after" shot of the chair half-way scrubbed.  Amazing, don't you agree?


The bowl on the chair is our small cleaning bucket (Here's an aside:  It's our puke bucket, too.  When I was little and had to be sick, I was offered either the toilet or a garbage can.  The garbage cans were never what one could call clean so it made being sick an even worse experience.  This blue bowl was handy one day years ago when one of us was sick; it's been the puke bucket ever since.  My kids were horrified the day they came home and Grammy had made a salad for dinner in the bowl; luckily their manners and instinct told them to not make a fuss.  Ever since, the bowl has not lived in the cupboard with the rest of the bowls but instead under the sink with its good friend scrub brush, and it hasn't made a food reappearance since!  Grammy was understandably confused about why we were a little disconcerted about the salad, but after thinking it over, commented that a puke bowl seems much nicer than a trash can.  I agree.)

Here are the materials you need for your amazing chair transformation:  household bleach (a glug into a medium sized bowl of water), about 6 pads of steel wool (I had this on hand in my furniture refinishing supplies.  If you've never used steel wool, you can buy it in the painting/staining section; it's inexpensive and comes in a large package.)  Finally, you'll want rubber gloves - because of the steel wool and the bleach.  (If you plan ahead, you can put a thick cream on your hands before beginning; the heat inside the gloves makes the lotion sink deep into your skin.  Lovely.)

Here is one of the chairs I did the day I read Diane's post about cleaning outdoor furniture.

Supplies on another plastic piece of furniture that I spray painted because I thought it would always be GRAY.

Here's the end result (with apologies for the bad photo quality.  As we say in Oklahoma, it was fixin' to rain and was overcast, and I wasn't complaining!)  The whole chair (underneath, back, legs, and all) took less than 45 minutes, and that was with stopping to do a mini-photo-shoot.  Now, for some of you, it's already the end of summer, so you'll be putting your patio furniture up for the season, but for those of us who live where summer lingers (I think "Oklahoma" is an old Indian word for "Land Where it is Ungodly Hot for Far Too Many Months Each Year") it's only now cool enough to actually go out and tackle a project like this.  (It's 96 degrees here today, for example.)  Whether you clean them soon or next spring, easy supplies and minimal effort can make your furniture live again to see another season?  Better than throwing it away, right?

And now for a cold beverage in my clean chair...ahhhhh.