Pages

Saturday, June 22, 2013

A Boat for our Beverages!


Oklahoma summers became FAR more bearable two years ago when our friends gave us their big, blue, inflatable ring pool.  We were skeptical that its less-than-four-foot depth and 16-foot diameter would A.) be large enough for adult fun and B.) stay cool enough to be refreshing.  We could not have been more wrong!  We LOVE getting in our pool, climbing up on our spring floats, and relaxing.  We've even learned how to read books and magazines while floating. (Carefully!  No library books!  Buy books at garage sales for the pool!)

Last summer, I paid 50 cents for an old Styrofoam cooler with a lid, designed to hold six cans (another garage sale find).  I assume it was designed for boating or fishing.  We used it as our Beer Boat by tying a string and clothespin to it. It floated along with us, safely holding our beverages most of the time.  Unfortunately, it sometimes became unbalanced.  "Beer overboard!"  is not what you want to hear in your pool!
Our original Beer Boat

This year, we have a new pool and summer is becoming crazy hot.  Fed up with the U.S.S. Tippy, I decided to innovate.  I had seen this floating cooler, but I don't need a whole cooler!  (How cool is it, though?!  I will definitely be keeping this one in mind if I have a party!)  Looking instead for individual floating cup holders,  I found this instructable and its related comments.  One prototype later, and here's my take on the beverage barge.

Materials

pool noodle
plastic cup big enough to hold your beverage of choice, in its container, comfortably
small rope (about 3 1/2 feet)
medium-sized zip ties (3)
palm-sized rock or handful of smaller rocks
sturdy mesh fabric  - maybe an onion or orange bag?

Step One - Cutting


Cut two 7" long pieces of the noodle.


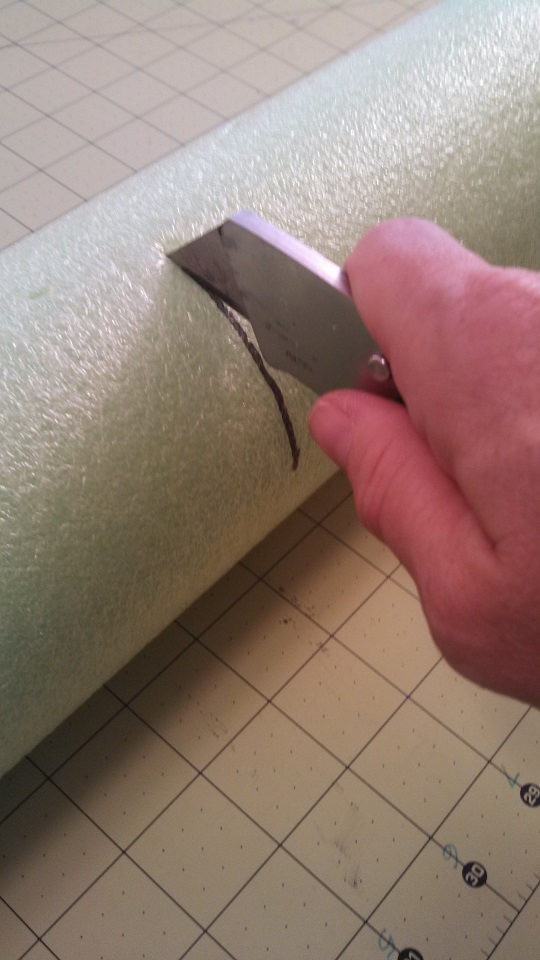
Cut a hole for your cup holder.

My cup holder is an Eskimo Joe's cup.  If you live in Stillwater, you have a cupboard or drawer full of these.  They hold 22 ounces, but they are shorter and squatter than regular plastic cups.  (I can relate to being shorter and squatter, darnit.)  You may have seen the Eskimo Joe's logo on t-shirts around the world.  It's famous.


The bottom of my cup had a diameter of three inches, so I marked three inches in the center of each noodle piece, then drew half a circle to cut.


Step Two - Connecting


Feed a 20" piece of rope through your noodle, from the end to the center cut-out, across to the other noodle's center, and out through the end of noodle number 2.  (Well.  That is probably one of the oddest sentences I've ever written. Probably a picture is a better idea.)


Do the same thing on the other side.  Tighten each side so the cup is held snugly between the two noodles.  Now, normally, this is where I would break out my hot glue gun, however, I'm skeptical that hot glue will hold up on plastic and foam, in the Oklahoma heat and sun, in water, so I was looking for a different way to keep the boat together.  Perhaps a nice squirt of silicone caulking might be an effective way to accomplish this.  I will let you know if I try it.  Today, I simply tied each piece into a snug square knot.  (Remember this from Girl Scouts?  "Right over left, and left over right, makes a knot neat, and tidy, and tight.")

Next, you need to add some ballast to keep the boat from tipping. Innovate!  Consider all the ways you can think of to add ballast to your boat.  One person recommended washers and steel ball bearings, but have you priced washers lately?  Plus, metal in the pool?  My idea was to make a little parcel full of rocks to hang under the boat.  I found a nice rock in my gardening supplies (unfortunately, we don't have a lot of rocks around here that would be suitable, so I used one that had been purchased for use in a flower vase.  Tip:  don't use sandstone!  It'll erode and give your pool a nice sandy bottom.)


Here I'm using a piece of old trampoline netting that was in our trash can this week.  You could try a plastic mesh bag from your onions or oranges, too.  Weave one of the zip-ties through around the top edge, then cinch it tight.

A little package of rocks.

Trim off the excess fabric at the top.  (Really, who's going to know if you do or don't?  I just like things to be tidy.)  Turn your boat over and put the rock parcel on the bottom of the cup.  Wind it through the rope, through the mesh, and zip it closed.  Do this on both sides.  It'll help hold your cup in place, too.  Warning:  don't pull the ties TOO tight, or you'll pop your cup right out of the noodles!  Whoops!


Step Three - Test and Enjoy!


Check it out!  I can put a 32-ounce drink cup (Sonic, anyone?) into my floating cup holder.


Here it is holding my more typical beverage of choice.  Note that my beer is wearing its shirt - this cup holder is even big enough for coozies.  (I am not a huge Spartan fan, by the way.  I just wanted a souvenir from our trip to Michigan State last month for Odyssey of the Mind, and a coozie fit the bill.  It makes me smile when I see my beer wearing a Sparty shirt.  Our other beer shirts are all from Oklahoma State; GO POKES!)

You can also see the prototype beer boat that I made yesterday, with its clothespin waiting to be clipped to a float.  The prototype used a styrofoam coozie that came with the six-pack cooler.  It works, but your beer can't be wearing a shirt and still fit in the boat, so I knew I needed a different option.

This weekend, I will give my floating cup holder a real test.  If modifications need to be made, I will report back promptly.  In the meantime, cheers! 


Thursday, June 20, 2013

A Surprise in my Salad!

I had to do a little "investigative reporting" the other day after a surprising discovery in my kitchen.
I bought nectarines at Walmart from these bins:
Yes, they all say, "Nectarines."  They are all priced at $1.98 per pound.  They are all, apparently, eligible for WIC stamps.  For all intents and purposes, these are the same.

Here's what I found when I cut into them at home:
Ah HA!  Did you know such a thing as a "white flesh nectarine" existed?  I knew of white flesh peaches, but didn't know about the nectarines.   Here's a close-up of the bins at Walmart, when I went back and investigated more closely:
Nowhere are they labeled as being different varieties on the bin labels - but - they do have two different stickers.  Also, now that I KNOW there's a difference, I can clearly see the difference in the skin colors.  When quickly throwing fruit into a bag at the store, though, the difference was far less noticeable!

We did a taste test.  The white flesh nectarine beat the traditional in all categories.  It ripened better, it was juicier, it cut easier (can you see how the orange nectarine in the photo above had to be sliced away from its pit?)  It was also a bit sweeter with a truer flavor. Incidentally, at our house we prefer nectarines - no fuzz and great taste.  The only drawback?  I miss the bright orange-yellow color on my plate, especially for the recipe I made using these very nectarines.  From this week's Weight Watchers meeting and its publication, I give you my version of their Arugula, Peach, and Goat Cheese Salad.

(I'm not going to take a photo of the recipe, because that would be copyright infringement, and you know, we librarians get a little sore about that.)

(I also don't have a photo of the salad, sadly.  It was devoured the minute I put it on the table.  Hungry boys at home.)


Chop up one peach (or nectarine, *wink*).  Peel if desired.  Put in blender (I used my immersion blender) with 1 Tbsp olive oil, 1 Tbsp red wine vinegar, a little salt, and a little pepper.  Blend.  Mmmm.  Smells delicious!  (I had to add 1/4 tsp sugar because my vinegar-pouring got a little out of control and my dressing was too tart.) You also might want to add a little water to thin the consistency.

On four plates, put a nice big handful of arugula.  Sprinkle with finely sliced red onion and some chopped pistachios.  Slice/crumble 1/4 cup goat cheese and sprinkle on each plate.  Slice one nectarine for each plate. Grind black pepper over each salad and drizzle with some dressing.

Four servings, four PPVs per serving.  Delicious!  I did have to put an astronaut chicken on the table to satisfy my carnivorous husband, though, but he really liked the salad, too.  (Astronaut chicken - you know, the ones in the capsules?  I believe that name was from a Stephen King book; we've used it ever since to refer to rotisserie chickens in the plastic containers.)

Did you know there were different varieties of nectarines?  Which do you prefer?


Wednesday, December 26, 2012

I'm such a good Girl Scout...

"Be Prepared!"  Did you know it's the Girl Scout motto as well?

Remember Hurricane Sandy (or SuperStorm Sandy or Frankenstorm - really, does the name of the storm matter if your house is washed away)? It hit me like a ton of bricks.  Thankfully, not literally.  Safe and dry here in OK (but having just been in New York City the week before), I heard stories from friends about family members being trapped in an apartment building ("It's okay, we're on the eleventh floor.  The water won't get this high," they said.  Hello?  Did you consider that the stairwell would fill completely with water, making it impossible for you to get out or for rescue crews to get in?)  and watched footage of water rushing through the subway entrance I used just the week prior.

My backpack from Our Chalet, the Girl Scout World Centre in Adelboden, Switzerland, now my car emergency kit.
Have you thought about what would happen if you had to "bug out" from your home?  Families who live in hurricane-prone locations (Florida, I'm looking at you) routinely pack up and leave home.  I'm sure they have checklists and are well-prepared.

Here in Oklahoma, we kid ourselves into thinking we'll never have to evacuate like that.  After all, tornadoes are short in duration, and we'd be in our shelter, right?  Hmm.  Tell that to the Oklahoma families who had wildfires surrounding their homes last summer.

I'm thinking a case could be made for everybody to have an emergency kit ready to go, and in fact, over the last few weeks, I put together four (FOUR) kits for our cars and for each of my kids' cars.  (The kits went under the Christmas tree.  I couldn't publish this post until after we opened our presents!)

This list is not the typical "in case you slide off the road into a ditch or have a flat tire" emergency list.  This is designed to be a 72-hour emergency kit that could keep you alive in the event you needed to evacuate your home (but boy,  it would sure be helpful if you did slide off the road and had to wait a day or two to be found, which happens.  I know, 'cause I've read about it in the newspaper.)

You can outfit your car for emergencies for around $100.  Backpacks and tote bags are great thrift store items; all of the following can easily be tucked into a backpack:

Emergency Kit for your car

Here are basic safety items you should keep in your car:
  • first aid kit
  • flares and/or a roadside triangle
  • jumper cables
  • cell phone charger that plugs into the lighter
Also very important to do:
  • always keep the gas tank half-full 
  • always keep 1 or more 2-litre bottles of water in the car (beware; gallon water jugs eventually leak.)
  • in the winter, put a tub of kitty litter, a shovel, and a blanket or sleeping bag in the trunk
  • always keep your cell phone charged
Finally, the backpack full of good stuff:

  • AM/FM radio; the one I bought can charge itself using its solar panels or you can wind it up.  It will also charge your cell phone if you have someone willing to wind it.  (I will try that one day and report back. You can also get battery-powered radios, but you should store extra batteries.) I bought this one (isn't it adorable?  The red one is for Tory's red car, and I got a blue one for Robin's blue car!) for $30.57 on Amazon:   Etón FR160R Microlink Self-Powered AM/FM/NOAA Weather Radio with Flashlight, Solar Power and Cell Phone Charger (Red) by Eton.

  • Flashlight (after changing a tire in the dark of a winter New Mexico night with several people huddled around the tire holding book lights, we realized the best flashlight is the hands-free variety)
  • work gloves
  • duct tape
  • ten-in-one tool (pliers, knife, screwdriver, etc.)
  • road flares (can be used to light a fire, too.)

 
  • hand warmers ("Hot Hands")
  • rain poncho (it'll be raining when you have to change a tire, trust me!)
  • Mylar thermal blanket (to my surprise, these cost less than $1.00 each.  I bought a pack of 10 for $8.95).
  • Whistle.  If your car goes off the road, eventually someone will come looking for you.  You can make their job much easier by blowing your whistle.  Remember the SOS sounds:  Three short, three long, three short.  Pause.  Repeat.  Way more effective than screaming.  (You should never take a hike without a whistle, either.)
  • Ready-to-eat, non-perishable food items:  protein bars, packages of nuts, dried fruit, candy bars, pouches of tuna or chicken, canned food items with pop-open tops, etc.  Store in  waterproof containers.  Think about the number of people likely to be traveling with you and pack enough food!  (And, yes, you do see a toothbrush and toothpaste - my family members are a little obsessive about dental care, and it's a comfort thing.)
  • water purification tablets (You already have water containers in the car, right?  You can use those to collect water and add the purification tablets. You can also boil your water for one minute to purify.)
  • (not really necessary but so nice to have) Glow Stick.  Conserve the flashlight batteries at night.  Plus the glow might attract help.
  • and for those uncomfortable moments when nature calls:  a roll of toilet paper in a plastic bag, some handwipes and/or disinfectant gel, and a package of facial tissues.

  • matches, lighters, or other firestarters (a medicine bottle holds three cotton balls smeared with petroleum jelly.  Shred the cotton ball, place some tinder nearby, and your fire will start much easier.  Twine can also be included for the same reason.)  After this photo was taken, I found waterproof matches in the camping supplies aisle.

  • For heat, cooking, and sanitizing water, my car kits include two kinds of stoves.  I will test them and report back.  First is a coffee can stove made with a clean quart-sized paint can, a roll of toilet paper, and a bottle of 70% isopropyl alcohol.  (Burning alcohol as a fuel does not emit toxic fumes so it is safe to use indoors, however, it does consume available oxygen, so you'd have to have a window partially down.) The directions for making and using the stove are here (I prepared the stove only, not the pot holder shown in the photos):  http://www.iwillprepare.com/files/pdf/handout-alcohol_stove_in_a_paint_can.pdf
  • The other stove is better for boiling water or cooking food.  I bought small saucepans with lids at the thrift store.  An example of an easy backpacking-type stove is here:  http://andrewskurka.com/how-to/how-to-make-a-fancy-feast-alcohol-stove/   The fuel for this stove is denatured alcohol (the easiest place to get it?  At the convenience store:  HEET gas-line antifreeze is already packaged in small plastic bottles!)

    Evacuating Your Home

    In the event you are evacuating your home,  there are some other items you will want to grab before you leave.  I plan to print this list, laminate it, and attach it to the car kit.  I've also heard of people keeping the list inside the garage near the door into the house.
    • copies of important documents:  marriage license, home mortgage, insurance policies, drivers licenses, passports, automotive (and trailers, boats, etc.) ownership/titles, wills, bank account numbers, a list of online passwords, address book and phone numbers, phone numbers of neighbors
    • credit cards and cash
    • extra food in sturdy containers; can openers; fuel for the stoves; cooking/eating utensils/equipment
    • extra water
    • sleeping bags or blankets, pillows
    • extra clothing, toiletries (toothbrush!), shoes
    • extra glasses/contacts/contact solution
    • any medications required
    • PET CARE ITEMS:  food, water dish, meds if needed, litter
    • INFANT/CHILD CARE ITEMS:  formula, more water, diapers, etc.  Meds? Spare clothing.  Games, books, toys.
    • Lock your house and shut off water, gas, and electricity as needed before you leave.
    • Let others know when you left and where you are going.
    Much of this information is available on a handy-dandy printable tri-fold brochure at http://foodstoragemadeeasy.net/fsme/docs/eprep-trifold.pdf.


    Growing up in Montana, every fall we threw a few bags of sand, a shovel, a blanket, and some candy bars in our trunk.  The emergency kits I made last week make me feel much (MUCH) better about my daughter driving across rural Nebraska.  I am breathing a little sigh of relief.  

    It feels good to be prepared, and it feels GREAT to have made certain my kids are ready, too.


    Monday, December 24, 2012

    Sunrise, Christmas Eve Day

    Even though it's only 20 degrees this morning, when I looked up from my cat-filled lap and saw the sunrise, I had to run out to our dock and snap some pictures.  Slippers sliding around on my feet, I startled ducks and geese and squirrels.  No time to grab a coat; sunrises only last a short while!
    A few minutes later, Tory came upstairs and got some nice shots of the tree with the sunrise out the window.
    A fabulous start to the day, yes?
    Happy Christmas Eve!

    Sunday, December 9, 2012

    Great (and safe!) Search Engines for Kids

    Years of integrating web tools with my classes has provided me with a plethora of favorite sites that I like to have kids use (yes, I wrote that sentence just so I could use the word "plethora.")

    Try this:  ask kids how they do a web search. The answer is (almost) always "Google."  When I'm teaching, I help them pull up a Google search and show them that 13 million results were returned, and ask them if they have time to read 13 million sites, and whether all of those would be kid-appropriate (oh, it's 86 and a half million if you're searching for sharks, FYI.)  They laugh and know I have something better up my sleeve.

    GAH!  Too many results!

    All of the sites shown (and linked) below have a keyword search (the blank box where you type in your search term) as well as category search buttons (unfortunately, the Yahoo for Kids site's search bar doesn't seem to be working as of this writing.)  Each of them ALSO has games, activities, and things to do.  Truthfully, you could limit your child to using one of these during a typical computer session (even for "play" time) and it would keep them happy for quite some time.  The results of the searches on these sites have been carefully selected for appropriateness and relevance as well as for accuracy.  

    When a student is doing research, it's important to teach them to bookmark sites or otherwise note where the information came from.  (It's just like when we wrote papers in college - you should be able to show where every claim you make came from.)  One easy way to teach kids this skill:  Have them research with a Word document open.  As they find good information, they can copy the info into the document (keyboard shortcuts work super well here:  CTRL-c is copy, CTRL-v is paste) and then go back and get the URL of the website and copy and paste it along with the info.  (This technique also saves paper - if you let them just print the page they are on, you can often end up with many more pages printed than expected!)  With the Word document saved, they now can make notes, organize information, and go back for more information if needed, since they have the URL of the websites they visited.  No bookmarks clogging up your browser, either. 

    (Note:  This post simply a suggestion that kids can find better information by using kid-friendly search sites.  There is a LOT more to teaching kids research skills.  This is not a post about research skills, nor is it a post about evaluating websites, but I do teach those things, too!   Stay tuned for more!)

    Sending kids to kid-friendly search engines and resource sites just makes sense. Let's limit their exposure to nastiness as much as possible, people! Here are a few of my favorites.

    Cybrarian http://www.cybrary.org/index.htm
     Hey!  Designed by a librarian?  Well, it MUST be good!

    KidsKonnect.com
    On KidsKonnect you can page down past the "fast facts" in each category to reach their selected links about the topic.
    Internet Public Library http://www.ipl.org/div/kidspace/
    One cool feature on IPL2 for kids is the languages area (Say Hello) where kids can learn about different languages.  Guten Tag!

    Yahoo for kids (used to be Yahooligans) kids.yahoo.com
    Yahoo's search bar is not working, so direct your kids to the Study Zone tab.  Show them that they can click one of the categories (shown below) and links to topics within that category will appear on the next page's left side.


    Let's be clear.  None of these sites works as well as Google.  

    But if you are concerned about internet safety for your kiddos, this is one way to let them do research and be relatively certain that they'll be linked to appropriate sites.

    Are there any sites you know of that should be added to this list?

    Next:  a few of my all-time favorite sites for kids to explore (and learn) - while having FUN!

    Friday, December 7, 2012

    Best Children's Fiction of 2012

     
    A few weeks ago, Publisher's Weekly posted their 2012 Best Books. I love annotated book lists, especially with images of the covers, so I copied the descriptions and pasted them into a Word document.  Alas, it was 40 pages long!  Since I'm a bit of a fanatic about saving paper, I resized each and every image and condensed the list.  It's now four pages long but preserves the book cover images, the excellent annotations, and the publisher information.  Then I went through each review to pull out the recommended ages for each book and added those.  It's a handy reference to take to the library with you.  (Use the download button to save it to your computer, then you can print it.)
    I'm especially excited to read the sequel to The Giver trilogy!

    You can see the actual slide show of the books and read the Publishers Weekly reviews of each title at http://www.publishersweekly.com/pw/best-books/2012/childrens-fiction#list. 

    Publishers Weekly 2012 Best Children's Fiction Have you read any of these titles? Which ones are you most interested in checking out?

    Tuesday, October 9, 2012

    The Day I Made My Whole Class Cry

    - OR - 
    Why what you see when you walk by a classroom isn't always the whole story.

    A teacher peered through the tiny window on my classroom door.  Inside, she saw a group of fifth graders, all clutching tissues, sniffing and wiping away tears.  "Well!" she thought.  "Once again, Mrs. Clower has worked those emotional, high-strung gifted kids into a frenzy.  Wait until the principal hears about this!"  She charged off down the hall, righteous head held high, ready to report my failings as a teacher to whomever would listen.

    Here's the thing:  appearances can be deceiving.  Would you like to know WHY my kids were crying in class that day?

    Taylor and Hailey created a model of Hungary's St. Matthias Church.  Check out the tile roof!
    The back story: 
    What kind of teacher am I?  
    My career as a military spouse provided me the opportunity to practice my teaching skills in a wide variety of locations and schools.  I've taught every elementary grade level, some middle school, worked with high schoolers, and even taught college undergrads (thank you, U.S. Air Force, for providing me with a long and interesting resume').

    One of my favorite positions:  the Enrichment Coordinator at two elementary schools.  The Enrichment program (a name chosen to disguise the fact that we were pulling out the gifted and talented) was designed to provide challenges above and beyond traditional classroom work.  As such, it was up to me to design curricula (and provide a classroom setting) that would inspire my kids to become lifelong learners and to learn to utilize their talents.

    (Oh my gosh, what a great job!)

    I was hired for the position based on several qualifications, even with no previous Gifted Ed coursework:  I had good elementary teaching experience, I had excellent volunteer experience including being a Girl Scout leader and event organizer and a classroom volunteer in my children's GT classes, and I was volunteering and substituting at one of the schools which needed the position filled.  The teachers and principal could see my work ethic and classroom management skills, and knew that I could work well with the staff.

    Gfited Students and Project-Based Learning
    Gifted students often do not have to exert much effort to maintain grades and remember the material presented in class, and sadly, they often spend vast portions of their day waiting.  (Please note that I am in no way criticizing teachers; it's nearly impossible to meet every child's needs in a traditional classroom and teachers often feel compelled to focus on the lower-achieving students.  This is one of the many valid reasons for providing educational enrichment classes to gifted kids.)   My job, then, was to give the kids real challenges through the study of interesting themes, and help them choose research projects that would occupy their minds and require a great deal of effort.  In addition, I wanted them to have the opportunity to practice some real-life skills that they would need as adults.

    Turns out, what I designed was a type of Project-Based Learning (one good explanation is here), which allows each student to choose a topic or theme to explore, create a project, and present the project to showcase his or her learning.  (I started teaching this way early in my teaching career in the regular classroom and have continued even in my library classes.  I do love helping kids work on projects. I appreciate the real learning that is involved, and the fact that each child can work at a level appropriate for him/her is a huge bonus!)

    Skills we integrated into almost every unit, regardless of the actual project created:
    • public speaking (how to write a good speech; how to speak clearly and loudly, how to inject personality into your speech and be comfortable and even have fun with your audience, and how to effectively utilize visual aids during your speech)
    • graphic design (utilizing desktop publishing skills and traditional poster-making skills)
    • elements of a quality product
    • time management and planning
    • decision-making
    • working with partners or small groups
    • research and synthesis of data (including evaluation of sources, research and note-taking skills, organization, citing sources)
    Do these look like skills adults use?  Are there any that you could use more practice on?  Consider:  What if you had been practicing these skills since early in elementary school?

    And now, to the story of my crying kids.

    Fifth grade, spring semester.  I've had these kids once a week since second grade.  They've worked hard for me during every unit:  creating an art museum full of Roman statues and a model of a Roman bath (the art museum had a fantastic display of Ancient Roman artifacts the year these kids were in fourth grade, so our unit choice was obvious), inventing new products, creating prototypes, and developing a sales pitch, and discovering the glass sculptures of Dale Chihuly and experimenting with organic, non-representational art.

    Something a little less academic is in order
    They've been through the research, learn, synthesize, create, and present cycle numerous times, and we only have a few weeks of school left.  It's time for something a little less intense.  Their choice?  They wanted to learn some basic cooking skills.  (Cooking skills?  Okay, I think we can figure out some interesting lessons for a cooking unit!)

    First up:  Knife handling in the kitchen.  The internet to the rescue!  We watched several different videos about how to safely and easily chop, dice, and mince.  (One of the best on knife use is at The Reluctant Gourmet; http://www.reluctantgourmet.com/chef_knife_skills_video.htm)  To safely supervise kids with knives, I divided the (already small) class into 2 groups:  one group went to the computers to research types of knives, their construction, use, cost, and care; the other group washed hands and got ready to dice and chop.

    (This is one of the videos we watched before donning our aprons.  It's Cooking Coarse by Chef Todd Mohr at http://www.youtube.com/watch?v=OiZr9cPPe1Q).

    "The root end is our friend," we reminded each other as we diced our onions into nice, neat squares.  By the time both groups were finished, we had piles of diced onions, bowls of diced onions, bags of diced onions...millions and billions and trillions of onions.  The entire hall outside my classroom smelled of onions and we all had tears streaming down our faces.  We finally got all the onions bagged up (to freeze for use in next week's lesson) and I sent my kids back to their classrooms, holding tissues, sporting red, swollen eyes and still sniffling slightly.

    To the world outside my door, the kids looked as though they had spent the entire enrichment class in tears.  Had they, in fact, been crying in enrichment class?  Yes.  Was there a valid educational reason for the tears that would not be readily apparent to an outside observer?  Well,  if you discount the wafting odor of onions, the aprons, the cutting boards, and the bags full of diced onions, I guess it's possible that you might think I was making my kids cry.  Sadly, teachers who are willing to judge harshly are also too often willing to disregard the evidence and will jump to (negative) conclusions.

    My kids, despite the tears, were delighted with their new skill.  Several went home that very evening and showed their parents how to dice an onion.  It's a life skill, people!

     A "simple" unit becomes much more through collaboration
    We finished our unit several weeks later by combining with the other fifth grade group, who had been studying countries and cultures.  We came up with the idea of "Eating Around the World" and created "restaurants" to showcase our learning.  My non-cooking class researched eating habits and typical restaurant decor in a country, while my cooking students researched and planned how to prepare a food to serve from the country.  Each country group built a "restaurant" in a corner of the classroom (separated by sheets hanging from the ceiling) that included tour guides, tables, placemats, decorations, and even "views out the windows."  (Vicky and Zoe spent days after school creating a scene of Venice for the Italian restaurant.  Nate and Riley took apart one of my bookshelves to make a low table for their Japanese restaurant, and even convinced their parents to take them to the local Hibachi place to take a lesson from the cook there.  Payton learned some French to properly greet her patrons.)  We invited third graders to come in, learn about each country, and sample a food from that country. 

    Paris, anyone?

    Third graders at the Hungarian "restaurant." 
    Italian food and geography:  In addition to the mural (not pictured) the girls made a salt-dough map of Venice and a drawing of Pisa's Leaning Tower to show the kids, too.

    Sigh...why is it even my simple units end up complicated? 

    The answer:  Such is life with gifted kids who have been encouraged to push the limits and do their best work.  Disregard that sigh and instead, celebrate with me!  Here's to crying in class!