
Oklahoma summers became FAR more bearable two years ago when our friends gave us their big, blue, inflatable ring pool. We were skeptical that its less-than-four-foot depth and 16-foot diameter would A.) be large enough for adult fun and B.) stay cool enough to be refreshing. We could not have been more wrong! We LOVE getting in our pool, climbing up on our spring floats, and relaxing. We've even learned how to read books and magazines while floating. (Carefully! No library books! Buy books at garage sales for the pool!)
Last summer, I paid 50 cents for an old Styrofoam cooler with a lid, designed to hold six cans (another garage sale find). I assume it was designed for boating or fishing. We used it as our Beer Boat by tying a string and clothespin to it. It floated along with us, safely holding our beverages most of the time. Unfortunately, it sometimes became unbalanced. "Beer overboard!" is not what you want to hear in your pool!
 |
| Our original Beer Boat |
This year, we have a new pool and summer is becoming crazy hot. Fed up with the U.S.S. Tippy, I decided to innovate. I had seen this floating cooler, but I don't need a whole cooler! (How cool is it, though?! I will definitely be keeping this one in mind if I have a party!) Looking instead for individual floating cup holders, I found this instructable and its related comments. One prototype later, and here's my take on the beverage barge.
Materials
pool noodleplastic cup big enough to hold your beverage of choice, in its container, comfortably
small rope (about 3 1/2 feet)
medium-sized zip ties (3)
palm-sized rock or handful of smaller rocks
sturdy mesh fabric - maybe an onion or orange bag?
Step One - Cutting
Cut two 7" long pieces of the noodle.

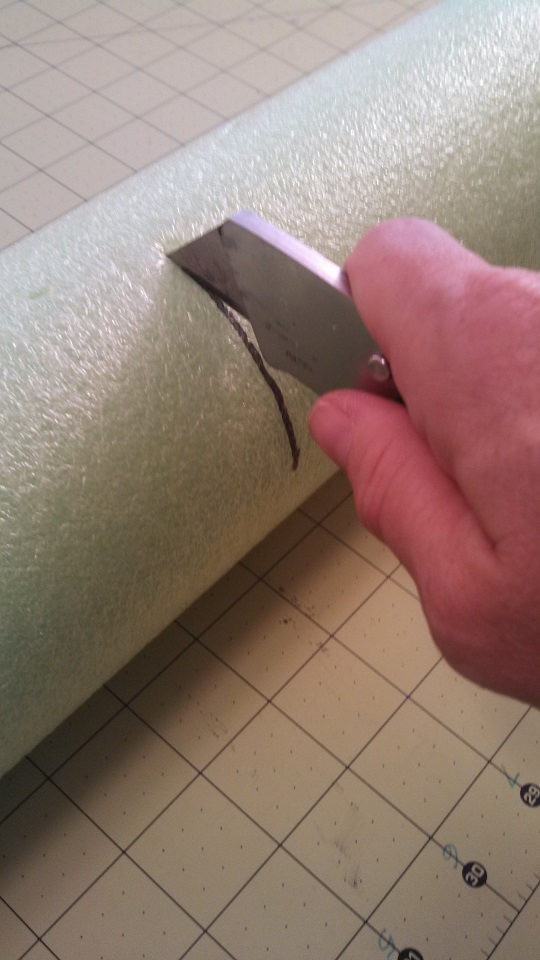
Cut a hole for your cup holder.
My cup holder is an Eskimo Joe's cup. If you live in Stillwater, you have a cupboard or drawer full of these. They hold 22 ounces, but they are shorter and squatter than regular plastic cups. (I can relate to being shorter and squatter, darnit.) You may have seen the Eskimo Joe's logo on t-shirts around the world. It's famous.

The bottom of my cup had a diameter of three inches, so I marked three inches in the center of each noodle piece, then drew half a circle to cut.

Step Two - Connecting
Feed a 20" piece of rope through your noodle, from the end to the center cut-out, across to the other noodle's center, and out through the end of noodle number 2. (Well. That is probably one of the oddest sentences I've ever written. Probably a picture is a better idea.)

Do the same thing on the other side. Tighten each side so the cup is held snugly between the two noodles. Now, normally, this is where I would break out my hot glue gun, however, I'm skeptical that hot glue will hold up on plastic and foam, in the Oklahoma heat and sun, in water, so I was looking for a different way to keep the boat together. Perhaps a nice squirt of silicone caulking might be an effective way to accomplish this. I will let you know if I try it. Today, I simply tied each piece into a snug square knot. (Remember this from Girl Scouts? "Right over left, and left over right, makes a knot neat, and tidy, and tight.")
Next, you need to add some ballast to keep the boat from tipping. Innovate! Consider all the ways you can think of to add ballast to your boat. One person recommended washers and steel ball bearings, but have you priced washers lately? Plus, metal in the pool? My idea was to make a little parcel full of rocks to hang under the boat. I found a nice rock in my gardening supplies (unfortunately, we don't have a lot of rocks around here that would be suitable, so I used one that had been purchased for use in a flower vase. Tip: don't use sandstone! It'll erode and give your pool a nice sandy bottom.)

Here I'm using a piece of old trampoline netting that was in our trash can this week. You could try a plastic mesh bag from your onions or oranges, too. Weave one of the zip-ties through around the top edge, then cinch it tight.
 |
| A little package of rocks. |
Trim off the excess fabric at the top. (Really, who's going to know if you do or don't? I just like things to be tidy.) Turn your boat over and put the rock parcel on the bottom of the cup. Wind it through the rope, through the mesh, and zip it closed. Do this on both sides. It'll help hold your cup in place, too. Warning: don't pull the ties TOO tight, or you'll pop your cup right out of the noodles! Whoops!

Step Three - Test and Enjoy!

Check it out! I can put a 32-ounce drink cup (Sonic, anyone?) into my floating cup holder.

Here it is holding my more typical beverage of choice. Note that my beer is wearing its shirt - this cup holder is even big enough for coozies. (I am not a huge Spartan fan, by the way. I just wanted a souvenir from our trip to Michigan State last month for Odyssey of the Mind, and a coozie fit the bill. It makes me smile when I see my beer wearing a Sparty shirt. Our other beer shirts are all from Oklahoma State; GO POKES!)
You can also see the prototype beer boat that I made yesterday, with its clothespin waiting to be clipped to a float. The prototype used a styrofoam coozie that came with the six-pack cooler. It works, but your beer can't be wearing a shirt and still fit in the boat, so I knew I needed a different option.
This weekend, I will give my floating cup holder a real test. If modifications need to be made, I will report back promptly. In the meantime, cheers!
Ok - first must buy a swimming pool...tough to do in Seattle, but can try....OR...go to one of the millions of lakes and give this a go :) We had a pool as a kid, and the floaty chairs had cup holders. Hope you are well - glad you are posting again! Kris Schennum Cromwell (p.s. I posted on your nectarines too, but I think my name was missing)
ReplyDelete